Create a Reasonably Secure Ubuntu Base Build

Generate a fairly secure Ubuntu virtual machine
Many of my posts present things you may want to practice or do yourself. This article is about creating a reasonably secure Ubuntu base build on DigitalOcean. Once generated, you can save a snapshot you can then use over and over anytime you want a server for many purposes.
Why Ubuntu?
Because I like it and I'm most familiar with it. It isn't "better" than any other build. In fact, for lightweight implementations like micro-services, you may want to try Alpine Linux. For high security, OpenBSD. For PenTesting, Kali Linux. You get my point. There's a Linux build suited to whatever you want to do. Ubuntu's a good general purpose server, and it's free.
Why "Reasonably" secure?
When I was in the U.S. Navy, I had a Senior Chief who had a saying; "Opinions are like assholes. Everybody has one." This is especially true for Linux security. Everybody has his or her opinion about what is meant by "secure enough".
I'm covering what I consider the essentials to have a secure base build for a general purpose server. You may go to town with the additional references provided at the end of this post to lock your servers down to your heart's content.
We want to take measures to make sure your base server build can't be easily compromised.
Why DigitalOcean?
It's inexpensive and has a clean, intuitive interface for creating and maintaining your infrastructure. You're welcome to use another free or inexpensive provider like Amazon Web Services or Microsoft Azure if you prefer.
If you're on a tight budget, you could do all of this for free using a local virtual machine running on VMware player, VirtualBox or a similar virtualization product
What are the steps?
We'll do the following here, linking out to existing tutorials where it makes sense to do so:
- Create a Droplet on DigitalOcean.
- Enable key based authentication for SSH.
- Update the system.
- Create a non-root user account.
- Give the non-root user account sudo permissions.
- Enable key based authentication for the new user.
- Test remote access for the new account.
- Test sudo privileges for the new user.
- Disable root access to SSH.
- Ensure password authentication is disabled for SSH.
- Configure Uncomplicated Firewall (ufw).
- Configure Fail2ban.
How to do it
You'll end up with a fairly secure base build by completing the following steps.
Create an Ubuntu 16.04 Droplet on DigitalOcean
Head to DigitalOcean and create an account, then create a Droplet (virtual machine) with the following settings:
[Note] You will be charged up to $5 per month for this. If you create a Droplet, follow this tutorial, then destroy it, your fee should only be a few cents. If you create and store a snapshot for future use, it will cost 5 cents per gigabyte per month per snapshot. A typical Droplet for me is 1 to 5 Gigs.
- Choose an image: Ubuntu 16.04.x x64
- Choose a size: $5/mo
- Choose a datacenter region: New York (unless you have a different preference)
- Select additional options: Leave blank
- Add your SSH keys: New SSH Key and add your public key
- Finalize and create: Keep default name unless you want to change it and click Create

Enable key based authentication for SSH.
When you're setting up your new "Droplet" or virtual machine on Digital Ocean, you have the option of uploading your public key.
Hopefully, you entered your public key at that time, and this step was handled for you by DigitalOcean. If not, you can follow this tutorial to do so now. If you follow that tutorial, you'll accomplish most of what is presented in this one as well. :-)
Update the system.
To update the system, simply run the following:
apt-get update && apt-get upgrade -y && apt-get dist-upgrade -y
Run this command immediately upon creating your Droplet, before installing additional software, and frequently thereafter. I recommend at least weekly.
Create a non-root user account.
When you create a new Droplet, the only user on the system is root. Since we'll be disabling remote access for root in a later step, we'll create a non-root user now.
adduser test-user
This command creates a user called test-user. Of course, substitute test-user with your desired user name.
Step through the prompts to create the new user. Be sure to create a strong password or long pass phrase for the account.
Here's the whole process:

Give the non-root user account sudo permissions.
Since you won't be able to log in as root soon, you'll have to give the new user permission to run commands as root using sudo.
usermod -aG sudo test-user
Enable key based authentication for the new user.
Add an SSH key so you can authenticate using the key for the new user.
Go to step 4 on this tutorial to create your key.
Be sure to set a password for your private key anytime you create one. Whether you use Ubuntu or create one on a Mac at the command line with ssh-keygen, or in Windows using PuttyGen, you should be prompted to enter a password. Pick a good password or passphrase.
Test remote access for the new account.
Before disconnecting the remote session you're using to do all this, make sure your new account works. I've had instances where the web based command line interface provided by DigitalOcean didn't work for me. Always test SSH before disconnecting your remote session to make sure it works if you've done anything that can affect SSH access or sudo privileges.
ssh test-user@your-servers-ip-address
If it's failing, you may find clues to help you troubleshoot at the end of the /var/log/auth.log.
Test sudo privileges for the new user.
Make sure your sudo privileges work by running a quick test command as root.
sudo cat /etc/shadow

If the command runs successfully, you're all set. If not, troubleshoot the issue before continuing.
You may again find clues in /var/log/auth.log if authentication isn't working.
Disable root access to SSH.
Since the only user configured when the server was set up was root, the root user had to be permitted to connect remotely.
For a configured and running server, this is bad practice. Everyone knows the username root for Linux. Everyone also knows it provides the highest privilege level available in Linux.
As you'll see when we enable ufw, attackers will constantly be trying to connect as user root.
Disabling root remote access protects you from misconfigurations that could let someone get on your system as the most privileged user.
Do the following as root, or preface the commands with sudo.
Make a copy of the /etc/ssh/sshd_config file we'll be editing.
cp /etc/ssh/sshd_config /etc/ssh/sshd_config.00
Edit the file using vim or nano.
vim /etc/ssh/sshd_config
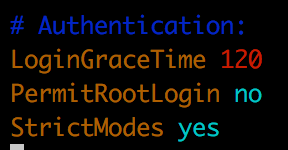
Find the line that reads PermitRootLogin yes.

Change it to PermitRootLogin no.

Save changes.
With vim, hit [esc], type :wq and hit [Enter]
Restart SSH to make the changes take effect.
service ssh restart
Test remote access to make sure it's still working.
ssh test-user@your-servers-ip-address
Ensure password authentication is disabled for SSH connections.
Now that root access over SSH has been disabled, and your non-root account is working with its SSH key and sudo has been tested, you can disable root remote access.
vim /etc/ssh/sshd_config
Find the line that reads PasswordAuthentication yes and change it to read PasswordAuthentication no. This step may already be done for you if you configured your Droplet to accept your SSH key.
Restart SSH to make the changes take effect.
service ssh restart
Test remote access to make sure it's still working.
ssh test-user@your-servers-ip-address
Configure Uncomplicated Firewall (ufw).
ufw is a firewall that is installed on Ubuntu's current versions by default. It uses iptables underneath, but the commands are much more straight forward than iptables commands.
ufw allow ssh
ufw default deny inbound
ufw default allow outbound
ufw enable
To check the status, you can type ufw status
If you want to see what types of traffic have been blocked, take a look at /var/log/ufw.log.
less /var/log/ufw.log

Test remote access to make sure it's still working.
ssh test-user@your-servers-ip-address
Configure Fail2ban.
Fail2ban is another open source security related application. It monitors log files such as /var/log/auth.log and blocks Internet Protocol (IP) addresses that have more than a few bad login attempts or are guilty of other suspicious activity for a period of time.
This stops the vast majority of automated scanning tools from being effective and makes even a dedicated attackers probing and attack attempts much slower.
Here's a tutorial showing you how. It's for 14.04 but also works for 16.04.
[Update] That tutorial's borked. I'll get one that's tested and works or my own steps up tonight.
[Update] I ended up removing Fail2ban, reinstalling, and creating a jail.local myself.
Here are the contents for the /etc/fail2ban/jail.local file:
[DEFAULT]
# Ban hosts for one hour:
bantime = 3600

# Override /etc/fail2ban/jail.d/00-firewalld.conf:
banaction = iptables-multiport

[sshd]
enabled = true
Relevant answer found here. I know, it's a CentOS article, but just modify the yum stuff with apt commands.
Test remote access to make sure it's still working.
ssh test-user@your-servers-ip-address
Add security features suited to your server's purpose
The build described just gets you a general purpose server without many avenues of attack. Ostensibly, you're setting up your server to provide some service in addition to SSH which you'll use to manage the server. A web server, name server, or mail server, for example. You'll want to add some more specialized security related software or tune what you've installed to protect the services offered.
Some examples
For a web server:
- Fail2ban - Provides some protection against common web app attacks and scans.
- ModSecurity - Provides a higher level of protection in the form of a full Web Application Firewall (WAF).
- CloudFlare - Free for personal use Content Delivery Network (CDN). Protects you by distributing static portions of your site and providing some Distibuted Denial of Service (DDoS) protection.
For a mail server:
- MailScanner - Open source mail security system.
- Apache SpamAssassin - Similar open source mail security project.
Your server here:
Whatever kind of server you're spinning up or have running, Google for open source tools that will help you secure it and follow security best practices which the maker of your software may have created.
References
Want to learn more about Linux security? Here are some references to set you on the path.
- Using Lynis to Audit Linux Security
- DigitalOcean Initial Server Setup
- My First 10 Minutes on a Server
- My First 5 Minutes on a Server
- My First 10 Seconds on a Server
- Ubuntu Security Guide
- 7 Security Measures to Protect Your Servers
- CIS Benchmarks
I caution you about overloading your server with too many security tools. Do some testing. I configured OSSEC which I've used and like on a web server, for example, but it does not run well on the $5 per month DigitalOcean Droplet due to resource constraints. It isn't OSSEC itself, but some of the tools it runs to do its system checks that choke the server.
Add new things in a test environment, or at a time when you're prepared to do your own testing or can watch for and correct performance issues if you don't have a test environment.
Check things out and try stuff. Search for lighter weight alternatives if somethings choking your server or upgrade your server if the price is reasonable.